Sunday, July 26, 2015

Cute Little Swim Bag or Wet Bag


Swim Bag or Wet Bag

I stood at the edge of the pool for several minutes before I sat down. A few minutes later I gathered enough courage to jump in. I nearly drown. I surfaced coughing up water saturated with fear. I cried.
That experience isn't why I plunged into creating this cute little swim bag or wet bag. It’s all because two little water-bug granddaughters want them, and because my daughter-in-law (their mother) is facing her own water fears as she starts swimming lessons soon.
It’s amazing what we 
accomplish 
when we choose to!
For this wet bag you’ll need:
(2) 6 ½” x 13” fabric
(2) 4 ½” x 13” fabric
(2) 11” x 13” Plastic fabric
(2) 4” x 4” fabric
(2) 2” x 2” fabric
(1) 12” zipper
24” trim
Keychain or carabiner (optional)
Plus all the sewing tools: Sewing machine, scissors, tape measure, straight edge, chalk or pencil, thread, iron, etc.
Also needed: A little know how, desire, some patience, and about 2 hours if you’re taking photos, but much less if not.
Ready? Let’s create!
Above: Note that you really need (2) 11” x 13” plastic. I cut the plastic for my 1st bag the size shown and it’s a little shy of perfect so on my next bags I cute the plastic a little larger for success.
FIRST
Cut all of your fabric pieces. You can use just one fabric if desired, but you’ll need to eliminate the center seam. (I used a medium weight matt plastic, but it is kind of bulky. For future bags I’ll try a light weight plastic shower curtain. The kind that is soft and flexible, not the more ridged thicker plastic.)
SECOND
Sew the outside fabric pieces together for the front and back. Iron the seam flat.
 
THIRD
Top stitch trim over the seam. I sew rickrack on both tips so they don’t curl up when washed and dried. (On the next bags I centered the rickrack over the seam. Much prettier!)
FORTH
Every zipper has instructions printed on the back and inside. You’ll even find info on how to shorten a zipper. If you bought one too long, you can follow the guide.
My instructions are NOT for an invisible zipper, but if you feel confident you can sew one in, that may work for you. If you purchased a separating zipper you can make that work. I chose one with nylon teeth because this is a wet bag and nothing is worse than a rusty zipper.
FIFTH
Finish off both ends of the zipper using the 2” x 2” pieces of fabric. Sew the wrong side to the right side of the zipper close to where the little metal stop (shown above). Fold the fabric flat, then under the end of the zipper, then fold the raw edge under and top stich it so it looks nice on the front and the bottom edge is caught in the topstitching on the back. This gives you a nice finished edge on the zipper opening on both the top and the bottom. If your zipper is too short you can use longer fabric to “lengthen” the zipper edge. Basically, all you are doing is sandwiching the end of the zipper inside a little fabric scrap. It’s nothing hard, and the only visible part is where you see the topstitching.
 
SIX
Ready to make little tabs? These make it easy to zip the bag open and closed because you have something to hold. You can also use the loop to hang the bag on a hook. If you add a keychain or carabiner this is where you’ll hook it on.
To make: fold the 4” x 4” fabric in half with wrong sides together. Now fold that in thirds with the raw edges inside. Topstitch along the edges. There you go—you’ve made a tab with strength that looks great!
Now all of your pieces are ready to assemble, so let’s get this cutie put together!
 
SEVEN
Line everything up along the zipper edge, with the zipper sandwiched in between (as shown above).
1.)  Place the plastic liner on the bottom (If there is a right and wrong side, place the wrong side up.)
2.)  Place the zipper on the plastic with the zipper pull facing up, so the zipper is right side up.
3.)  Open the zipper 3 inches.
4.)  Place the pretty outside fabric on top with the right side down.
5.)  Pin the beginning end only.
I’m not into pinning pieces together (thanks to my factory sewing jobs where tiny marks, notches and speed took priority along with perfection). I pinned just the starting point because I didn’t want anything moving. I specifically didn’t pin further into the bag because I don’t want holes in the plastic liner. Notice the little end I sewed to the zipper hangs out a little. That’s just fine. I trimmed it off later.
 
EIGHT
If you haven’t done it yet, switch to a zipper foot at this point.
1.) Open the zipper a few inches, maybe 3” – 4”, and sew in the middle of the zipper fabric. Make sure you catch the fabric and plastic well enough that the seam won’t pull out after you've used the bag a few times. Also, be sure to place your stitches far enough away from the zipper teeth so the zipper pull won’t get caught in the fabric as you open and close the bag. Basically, this means sew in the center of the fabric of the zipper and be sure the fabric and plastic don’t slide out of place as you sew.
2.)  About an inch before you reach the zipper pull, place the needle down in the fabric, raise the sewing machine zipper foot, zip the zipper closed, lower the zipper foot, and finish sewing that side of the zipper.
Don’t let these cautions and details freak you out. If you’re experienced in sewing in zippers this will be natural for you and you’ll think I gave too many instructions. But if zippers are relatively new to you, you’ll want to pay close attention as you sew and you’ll appreciate the details I’ve shared. Overall, don’t worry about it too much because you can unpick and redo mistakes if necessary. There are seldom ever stitches sewn that can’t be taken out. I was a professional seamstress for years so I became a pro at unpicking. It’s one of my best talents so I don’t let zippers or other seams scare me. Don’t let them scare you either.
NINE
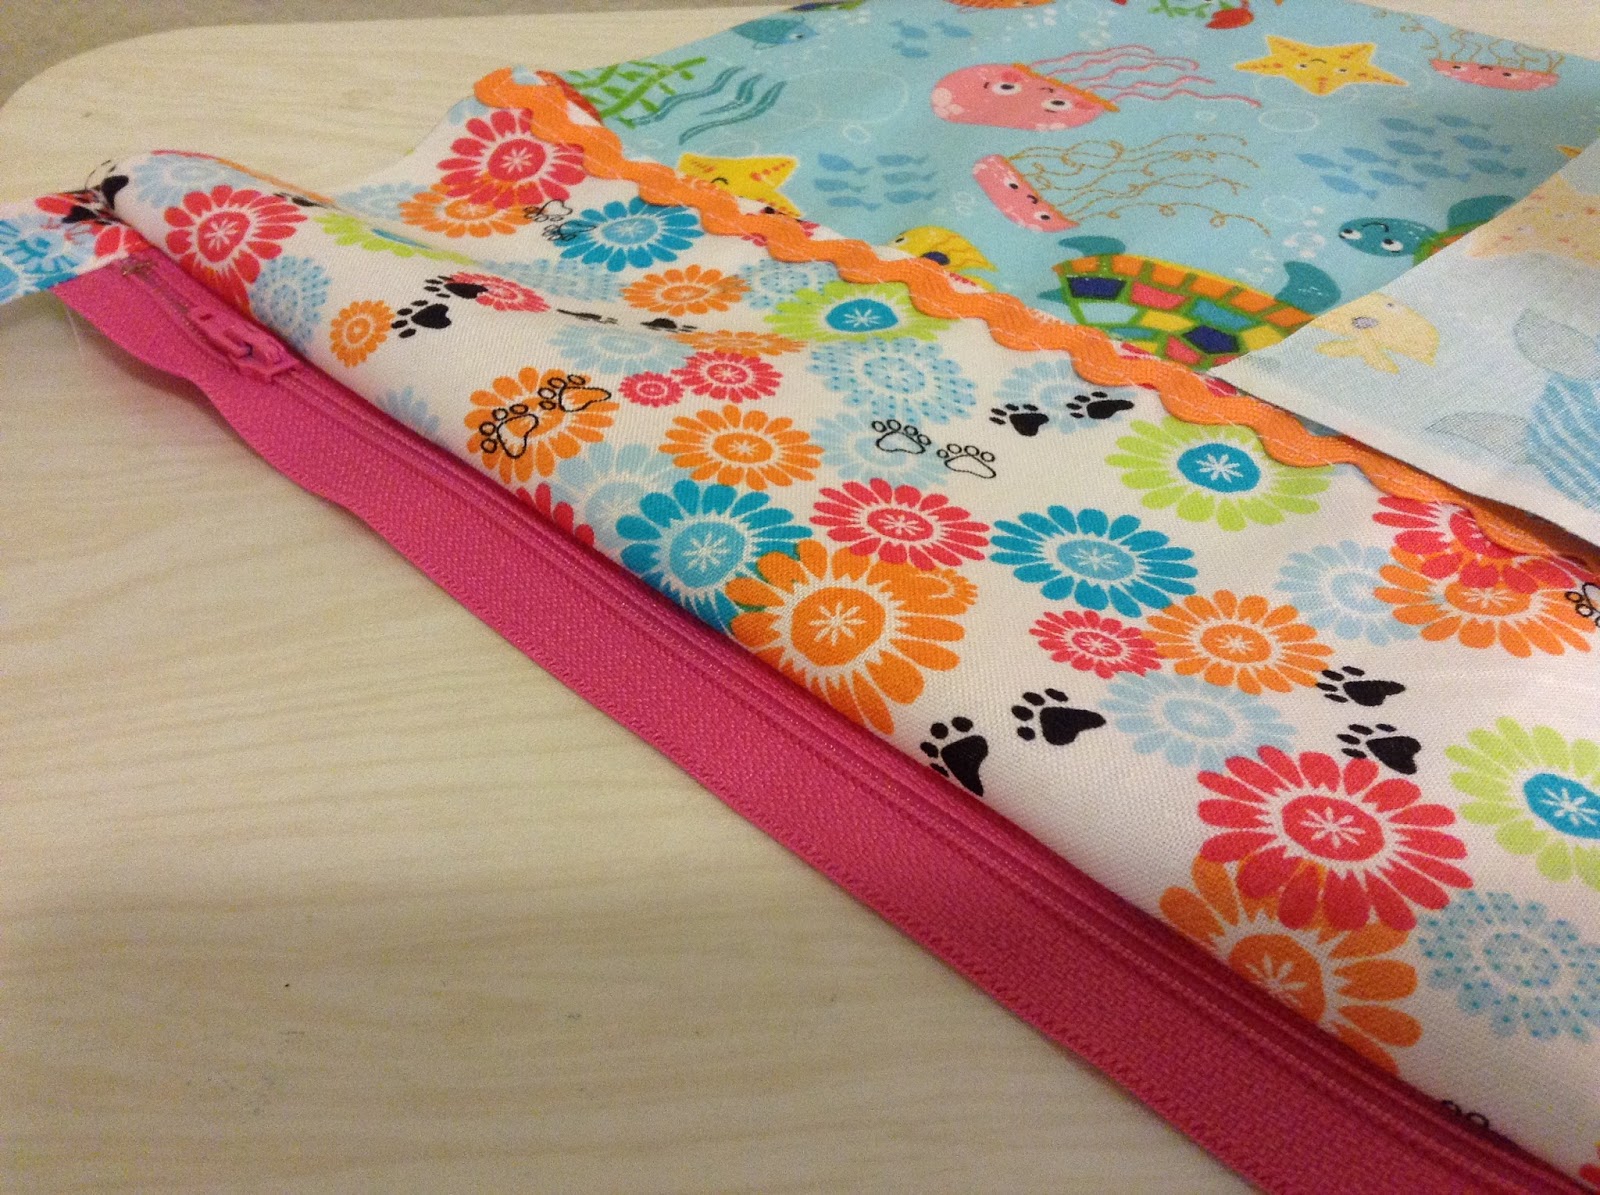
Look at that pretty zipper! Once the first side is sewn to the zipper you can fold both sides (fabric and plastic liner) away from the zipper and admire your work. Sorry, but you can’t iron the fabric flat before you topstich because you don’t want to melt the plastic liner to your ironing board. Instead, “hand press” the fabric. That means apply pressure with your fingers to get it as flat as possible.
TEN
Topstich the first side down. This is when you’ll know if you allowed enough room for the zipper pull to easily move up and down without interference from the fabric. Test it out a couple times by zipping up and down. If the fabric is too close to the zipper pull, now is the time to undo the seams (yes, I said seams—so go ahead and undo both of them if necessary). Adjust them and sew again. Redoing one side—the unpicking and resewing—should take about 5 - 10 minutes if done now, but the end result will be worth it. Trying to redo it later will take much more time and could possibly be impossible. Nothing is more annoying than a zipper that you can’t easily open or close. (Actually, many things are more annoying, but when you pick up your pretty bag, you want zero annoyance and lots of love, so take the time to redo mistakes that might bother you later.)
 
ELEVEN
Repeat steps 7 through 11 to sew the other side of the zipper. That sounds like a lot, but it’s just lining up the zipper so the plastic liner is on the bottom, the zipper is sandwiched in the middle, and the pretty outside fabric is placed right side down. Line up the ends (make sure it’s centered so one end doesn’t hang over on one end, making the other end too short). Sew, putting the needle down and lifting the pressure foot as you near the zipper pull, and zipping the zipper shut before continuing on. Turn. Hand press flat. Top stitch.
See, so easy!
Stop now for three seconds and do a little happy dance
because you can see this is going to be 
absolutely cute and successful!
TWELVE
Remember those cute little pull tabs you whipped out in 10 seconds at the beginning? Now it’s time to sew them onto the ends of the zipper.
1.) Switch back to your regular sewing machine foot.
2.)  Next, line up the tab ends to the edge of the bag (not the overhang sewn onto the ends of the zipper, but the ends of the pretty fabric).
3.)  Sew using a 1/4” seam allowance.
4.)  Double and then triple the seam to make sure the tabs are 100% secure. (Smart move, eh? I don’t want those tabs ever coming undone!)

THIRTEEN
By now you might be saying, “Wow! How many more steps are there before I can use this bag?” 
Don’t get discouraged. We’re on the homeward stretch. I divided the steps up so nothing is left out, and if you’re a beginner bursting with creative excitement, you’ll make it to the end. This really is much easier than you think. But now, for the next few steps you won’t see the pretty outer fabric much, just the frays and seams and faded inside of the fabric. Don’t lose hope. Pretty will come within five minutes or sew (um, or so).
1.)  Turn your bag so both plastic sides are together. As seen above, the plastic sides are away from me.
2.)  Fold the zipper ends and tab ends as close to center as humanly possible.
3.)  Match up the trim seam and pin in place. (You don’t want your side seam looking skeewampus!)
4.)  Pin the bulky zipper at the center fold. (If there is floppy fabric along one side between the zipper and trim, ease it in rather than repin the trim seam. Remember, you don’t want you bag looking lopsided.
5.)  Unzip the zipper about half way. (Um, for reals, unzip the zipper about half way.)
You will be sewing over a lot of bulk, so take your time and honestly, remain calm and get things lined up and those zipper ends finger pressed as flat as possible. But don’t worry too much. This is doable!
FOURTEEN
Sew a backwards “U”, using a 1/2 inch seam allowance.
I know, that sounds strange, so let me explain. When you write the letter “U”, you begin on the upper left hand side, go downward, across the bottom, and finish on the upper right hand top. To sew the bag you’ll begin at the top right hand edge and sew the right hand side first, as shown above, sewing it like you’d write the “U” going backwards.
1.)  Did I already mention you should unzip the zipper about half way or a little more? If not, go ahead and do it now. (Trust me on this!)
2.)  Ready to sew? Start at the top right hand edge of the plastic liner and sew toward the wonderful center where the zipper, tab and beautiful fabric all meet. (Doesn’t that sounds fun and easy?)
3.)  Slow down as you reach that massive bulge which moments before you considered as just significantly huge, but now discover is actually a gigantic mountain!
4.)  Sew one even stitch at a time over that massive bulge, removing the pin when you’re a stitch or two away from it. Caution: over the bulge don’t lead-foot it at full throttle, don’t gun the motor and race over it (or attempt to), and don’t try to fly over it like you might if you were in a car approaching a speed bump in the road. Just sew one stitch at a time. I turned the crank with my right hand for each of the 7-8 stitches I took and coaxed the fabric along. If each of those stitches took an extra 7-8 seconds, then going slow over each zipper end took me an extra 15 seconds. Humm, 15 extra seconds verses a broken needle, a seam that had to be redone, or possibly a sewing machine knocked out of alignment or something worse? Yep just help your little needle along over that huge bulge, taking it one stitch at a time. Same with the few stitches coming down off that tall mountain. You’ll thank your sweet sewing machine for handling it so well, and yourself for not panicking and unpicking, but for being totally awesome, patient and completely in control. Yay, you’ll conquer that bulge!


FIFTEEN
Open the zipper all the way and turn the bag right side out. Wow! Can we say “awesome” too many times? Nope! Look at how incredible that is! You are almost done! At this point you can iron the fabric side if you want, but please don’t iron the plastic side. (Note: there are a couple more steps to go, but all are easy, fun and will take less than 3 minutes!) But first, here’s something you possibly don’t know:
Note about zippers: most are made with a tiny lock inside the zipper pull. When the zipper pull end is flat against the zipper in the downward position (not pointing up to the open end), the pull is “locked” in place. When the pull is lifted away from the zipper and toward the open end, the “lock” opens and you can slide the zipper pull to open or close the zipper.
Think of your jeans. You zip them up, and as long as the lock isn’t broken, the zipper pull stays up at the waistband and your zipper stays closed if you turn the little pull to face downward, or to point toward the zipped up portion of the zipper. Isn’t that amazing how gravity has no power over your zipper as long as the lock isn’t broken?!? But if the lock breaks the pull slides down and you’re embarrassed. You toss out the jeans if you’re afraid of or can’t find a safety pin. (Believe me, it’s hard to replace a zipper in jeans.)
The tiny zipper in your bag works the same way. Don’t ever force a stubborn zipper or yank on a pull, thinking it is stuck. It might have something caught in the teeth, but it might also only be the position of the pull. Just lift the pull into the “unlocked” positon and it should easily slide.
But what about a pull that breaks off? Now what? Don’t toss the bag, but try this: Place a paperclip through the tiny loop where the pull was and use that. Since paperclips can sometimes be tacky you can also try using a jewelry ring, and attach something cute to replace the pull. The little metal ring can apply pressure to the lock so you can move the pull. (Just thought you might like a little zipper up and up!) 
Back to creating!

SIXTEEN
The plastic liner is open at one end, and all the water draining from your swimsuit will escape if it isn’t closed. Now it’s time to make your bag almost waterproof. The bag will never be 100% waterproof, but it will be close. (If you make a wet bag to hold soiled cloth baby diapers, be aware that fluids and odors will escape.)

SEVENTEEN
Turn the edges inward about ½” inch and finger press them flat. I don’t pin through plastic, so when necessary I adjusted the fold as I...

EIGHTEEN
... sew along the end.
The sewing is completed! Push the plastic liner into the bag.

NINETEEN
Attach the carabiner or keychain to the loop on the end where the zipper pull is located when the bag is closed. I chose this end because if the bag is hung on a hook while filled with wet items, the zipper can then be closed easier and it’s less likely any fabric will catch in the zipper teeth. (No 100% guarantee there, just less likely.)
TWENTY
One cute wet bag or swimming suit bag is ready to fill after a fun day in the pool or at the beach! On the ride home your swimsuit won’t work its way out of a soggy towel and against the spare tire or under feet where it could get dirty and gross. In a cute bag it's less likely to be accidentally nudged out the door and onto the parking lot. And no bye-bye swimsuit if it tumbled out when the towel was dropped. Of course, it doesn’t guarantee your kiddo won’t leave it in a friend’s car or in the booth at the Dairy Queen after eating a triple-decker chocolate-topped ice cream cone.

Clip it onto your shoulder bag, or let it be your main bag. You can tuck sunscreen inside, zip in a few bucks for a slushy, and keep track of your car keys, sunglasses and pool pass either inside or on the keyring. If you don’t add a keychain or carabiner the little loop you sewed in the seam will work just fine for hanging on a hook. It really doesn’t need to be any bigger than a loop your finger slides into.


Here’s the rundown:
Time: About 1 hour, give or take. Add 1 or 2 more depending on interruptions and your skills. (That doesn’t include shopping or sewing machine set up or gathering supplies.)
Difficulty level: Easy if you know how to sew and are comfortable with zippers. It may take a little longer, but it’s still easy if you’re unaccustomed to working with zippers and mixed materials (fabric and plastic).
Cost: You can’t buy one for what you’ll pay for this, but you can use scraps from other projects if you want to cut the cost down even more. A keychain or carabiner are optional. I considered them jewelry and loved the idea of adding color as well as versatility. This won’t break the piggy bank, but zippers are not free, unless you have a spare one hanging around in your sewing supplies.
Fabric: I chose plastic with a matt finish because I thought it might be easier to work with. It was! I’ve used shiny plastic on other projects and basically cursed it the whole time. I used cotton fabric that will bleach in the sun and with chlorine water on it. It will fade and wear out eventually. I suggest rinsing out the bag when emptied to slow down those affects. In the future I’ll try a light weight matt plastic shower curtain liner to ease bulk and make it lighter and have a softer more flexible finished product. I would avoid bulky fabric like denim.
Trim: This is optional. You can topstitch it on or sew it into a seam like piping. You can use lace or any other trim, such as contrasting fabric, braiding, etc. The front and back can be cut from one piece without a seam or trim.
Care: I’d suggest rinsing the bag after each use and line drying with the zipper open so the inside and outside thoroughly dry. The keychain or carabiner can be removed and it can be machine washed and dried, but personally, I’d only partially dry the bag so the plastic liner doesn’t harden and crack or melt. I’d finish drying it on a line, and in the winter I would try to dry it over a heat vent if possible. 
I can’t think of anything else, except enjoy making and using this little treasure!
 
Oh, and also this little tidbit: I believe creating encompasses a lot more than making something pretty or useful. It’s a way of bringing joy to our lives as we expand our talents, skills and abilities. It refreshes our attitudes and enhances our can-do feelings. It really, honestly is worth it because we become a better person and the world becomes a better place because our outlook brightens and our possibilities increase. We are giving something of ourselves for something wonderful and new.

Happy Creating! 

(And to my cute little Grands and their mom who might see this before the package arrives, happy swimming, and watch the mail! And especially Happy B-day sweet little A! This one was hand-picked and hand-created with love just for you!)

Saturday, May 9, 2015

What I Believe - Labels


What I Believe – Labels
 
I opened my front door and welcomed inside my neighbor and fellow ward member. She told me I have a beautiful home—you know the polite words to use when you first enter someone’s home whom you barely know, beyond their name. 


I understand. I’ve said the same things in similar situations, and dropped it there, not saying I love the color scheme, furnishings, art, or whatever stands out as distinct that seems to define that person to me.


Together my neighbor and fellow ward member sat with me in my living room for perhaps 10-15 minutes discussing our business at hand when she stopped and looked around as if seeing our surroundings for the first time. She blurted out, “Your home is so clean. So perfect.”


It was sweet, but such an abrupt change of subject that I was caught off guard. I thought, “Do I thank her or say, ‘Oh, you have no ideas what unkempt disasters lie behind closed doors that I still need to tackle and tame to perfection before I….” 


Nothing came from my lips because I didn’t want to announce I was putting my house on the market soon. But, even if I’d wanted to comment, I had no time because she immediately added, “You’re OCD.”


WHAT?


I had no reply—just a dead brain.


What did she just say?!? The comment echoed like there was nothing inside my head. OCD!?!


Nothing intelligent, humorous, snide or even polite came out of my lips, although several comments started bubbling up that I successfully refrained from saying. I simply went on with business as if she hadn’t interrupted us. But for the final 20-30 minutes little thoughts niggled in my mind: Did she want to talk about order? Was she focusing on cleanliness? Is she tuning into my decorating taste, style and skills? Is she compiling evidence to convict me of being over the top OCD? What is going on in HER head!?!


Obsessive-Compulsive Disorder—OCD—you know the most obvious and common signs they list, so her words came as if she’d pointed her finger at me and said, “I’m sure you just washed your hands thirty times, you cleaned your house all day, and just before I arrived you straightened every object on your dustless mantle five times. Therefore, you are OCD. I don't even need to look in your closets or under your kitchen sink to know!"


I ignored the whole incident, got business taken care of, and walked her to the front door and let her out.


What I didn’t tell her was:


“While in my home you were and always will be safe from being labeled, knowingly and unknowingly, to the best of my ability.”


“While in my presence you will not be intentionally labeled by me, but I will defend you if others try to label you.”


“While you looked at my home and commented on how beautiful, clean and orderly it was, I didn’t tell you I’m currently in a mad scramble to prepare my home for sale, and I am standing back with a microscope and critiquing every inch. Every color is being challenge and every object is being reviewed, even those on shelves and inside drawers.” (Below is the result of what happened in my "Creative Room" shown in chaos above.)


“While in my home you had no clue what pressures I’m facing, choices I’m making, and the work I’m doing and why. And it’s not just lifting and moving objects, but I’m making decisions that affect our belongings and our current and future lifestyle, and that is sometimes gut-wrenching, fatiguing and difficult.”


“Probably on the day the For Sale sign enters my yard you won’t even remember your comment while in my home or consider how the sign correlates to what you saw while here.”


I’ve thought a lot about the hasty label taped on my forehead (that’s how it felt) and how it affected me then, as well as its after affects in the weeks that followed. I’ve thought about my cleaning and organizing habits, abilities and preferences.


Thinking about who we are and how we’re perceived isn’t negative unless we think it is and we end up letting it make us feel crazy. What came from this incident is:


Why do we label others without anything more than a visual or verbal cue that could be a million miles off base? What prompts us to tell a person what label we’ve just given them? (I’ve told people labels all the time?!? Yes, I have! “That is so cute; you’re creative,” or “That looks like you’ve worked hard in it; you’re patient.”) We all attach labels on others and then dance away feeling like we, I don’t know, like we complimented them? Assured them? Taught them or helped them? How can we know if our label was helpful or a hindrance? We usually can’t.


I’m assuming my neighbor never gave her OCD verdict another thought, but that doesn't matter. Also, I have no clue what her home looked like that afternoon or week, and whether it affected her perception of mine. Was it a war zone of laundry and clutter everywhere? So dusty she could write a novel on the end tables? A mismatch of stuff, things and colors? Disorganized with ill-defined spaces and narrow passages between heaps? Dirty with dishes and sticky messes on every surface? Wreaking with foul odors? I have zero idea how her home usually is, and will probably never know. It could be elaborate and magnificent and palace-like, making mine appear like impoverished cottage squalor in comparison.


Eventually my thoughts moved away from why we label others, because really, I could care less why she labeled me as she did, and my thoughts moved toward who I am—really and truly. Fortunately I know who I am (being a little older and living honesty has advantages), and the purpose behind why I do things the way I do, and why I’m currently stepping up my house cleaning and home organizing game. I knew clearly and exactly what my motivations were that day. My thoughts since then have focused on something else I’ve been wondering about for a lot longer:


Why are some people more inclined to be tidy and clean, and others aren’t? And, why are some people inclined to be organized and others aren’t? What are the defining characteristics between the two groups?


First, I know there is no group on one far side facing a group on the other far side. It could be pictured more like a long road with individuals all paused at any given moment at some point, and rarely are we stationary on that road. We’re all constantly moving one way or another at a shuffle, a healthy trot, plodingly, sprinting, etc....


Where am I?


I know where I am. Over the years my interest and skills in order and cleanliness have increased and my techniques have improved, so my direction is pretty well defined and clear. 


My motivations:


Beauty: I love to visually see beauty, harmony and balance. Order and cleanliness have naturally followed. I dislike encountering messes in a closet as much as seeing them on the kitchen counter. 


Laziness: One of my driving forces is loving to relax. I’d prefer to assign parking places for my belongings and arrange them there, and then sip an icy Dr. Pepper while I do something less strenuous or more rewarding. When it comes time to grab my car keys and go, I don’t have to search—I’m free to go. When I want to switch TV channels I know where the remote should be within a ten-inch radius. 


Budget: I’m a super tightwad. Period. I hate spending money on purchasing something twice when not necessary, like buying another this or that because the one I had got stepped on and broken because no one bothered to stoop down and pick it up and put it away. 


Last year I walked through too many filthy homes as I searched for one to buy. I’m talking about more than messy, cluttered and disorganized homes—I’m referring to stinky, disgusting, repulsive living spaces where men, women and children resided. They should have been nice homes in nice areas. They were filled with expensive furnishings that had been abused and neglected. The homes, their features and furnishings were not appreciated. The families treated them with disrespect. Everything dirty and broken could be moved out when the house sold, but how I’d viewed the home couldn’t be shaken from my mind. The disregard I witnessed was appalling. It hurt my heart to see the evidence of abuse and the lack of gratitude.


So why are some people clean and some not? Why some organized and others not? Why do some neglect and abuse and some don’t? Why do some people care more than others?


A couple of years ago I read several studies on these topics and discovered there were two camps: one claimed that free thinking ideas, creativity, better planning, higher production and more satisfying interpersonal skills and relationships came from those who live in clutter and untidy surroundings—even utter messes and chaos. Their brains simply don’t deal as much with their surroundings or get bogged down in them so much, so they have greater freedom to create, plan, develop relationships and carry projects through to fruition.


The other study found the exact opposite to be true. Those who lived in orderly surroundings and took responsibility for cleanliness and personal day to day routines of caring for their belongings and environment actually created more effectively, with greater detail and with greater spontaneity because they were not searching for equipment or tools, worried about unseen yet desired belongings, or concerned about how their surroundings might adversely affect their relationships. They were free to create, plan and carry ideas and project through to fruition more easily and with better results.


There you go—two camps. Who is right and which actually performs best?


I guess we can’t tell, can we, although I had a friend who confessed she never invited friends to her home as a teenager because her mother—an ultra-creative woman—had consumed every inch of the home with her projects and “junk” to the point there were no places to walk, sit, stand or move. Even the fridge no longer functioned as a fridge. But I had another friend who rarely invited anyone over because her mother was so picky about anyone stepping on her freshly scrubbed floor of putting their behind on her freshly vacuumed sofa. Both were extremes that occupied their lives and affected their families.


My thoughts lately have centered on why one person chooses clean and orderly, and another doesn’t. If both people thought it through logically and rationally from their own side and vantage point, and then switched and thought it through from the opposing side just as logically and rationally, what reasons and/or excuses would they select for their circumstances and choices? How would they label themselves? Would the make changes?


I can’t tell why someone else makes their choices, but I know why I’ve made mine. Besides loving beauty, being lazy and living within my budget, I also don’t want to be labeled in some of the negative ways I heard directed at me as a child and teenager. I was told I shirked responsibility. I was told I was immature. Those accusations affected me deeply because in my young teenage mind I thought I’d surpassed the expectations placed on me in those memorable experiences.


But those labels—hastily given and harshly administered at that time—taught me something valuable: never walk away from a job before making a 360 turn around to check every last inch to see if there is something overlooked or more that I can do that will make the job more complete and the outcome better. Those labels became lift-off points when I chose to be responsible not out of fear, but out of maturity and for personal satisfaction. They became a way of paying myself for what I’d done, and not expecting or demanding payment in any form from someone else, but also not feeling slighted, offended, hurt, angry or a failure if what I did wasn't noticed by someone else. 

I became who I am for myself.


It’s the same whether doing something in the home with personal belongings or in the working world. It didn't matter if I was cleaning my car, doing laundry, or invoicing or bidding jobs for my employers. 


Growing up I might have been labeled as immature and irresponsible, and my neighbor hastily labeled me OCD not long ago, but I won’t accept these kinds of labels. I consider myself mature and responsible with my home, surroundings, belongings, relationships and life, and not compulsive as if acting without thought or purpose. 


Another question: How do we develop a positive character trait without being labeled the opposite first, and feeling like we have to fight against that label? And what if we’re labeled something negative, do we rebel against the label or submit and accept it and live as if it’s our only plausible reality?


Can you see how powerful I consider the mind to be—each individual’s mind—and how I view the thoughts and words we consume (fed to us by others, or that we prepare and serve to ourselves), whether willingly, knowingly, or innocently as powerful forces?


My conclusion about labels is that the only binding ones are the ones we accept by choice—that we claim and own—the ones we act out and shape into our personality, reality and destiny. And many times those labels are not right, healthy or good for us, but we can change them if we choose. Others may openly or silently label us, but if we examine ourselves honestly, we’ll know the truth and can act on truth if we want, rather than on the labels. Words and labels, whether truth or not, affect us. But the real weight of their affect is something we personally choose. We are not victims or innocent bystanders. It’s not a matter of whether we’re gifted with wonderful soothing words and labels, or dumped on with painful ones, that give us options to choose from. We choose our labels no matter what comes our way. 

When we live life on the surface it’s hard to uncover our real motivations or excuses, but if we want to be honest about them and are willing to search a little deeper—remember honestly—we’ll discover our driving forces and our most common roadblocks. We know the fears that drive us to success or cripple us, and we also know the experiences and incentives behind our thoughts, words and actions. 


This post has been long. It’s heartfelt and serious. I’ve walked into extremely messy and hazardous home environments in my life and been able to focus on the individuals there. That takes courage and love. It takes patience and sometimes a strong stomach. It's a work of love. But knowing what I know about maturity, responsibility and love, it breaks my heart to see squalor and hear explanations and excuses, especially when I asked for none. Filth, chaos, lack of taking responsibility, excuses and disorder don't just decay a physical environment, but these also affect the persons living in that environment in social, emotional and spiritual ways. They hurt the souls and seep into tender spots in hearts and whisper unstable half-lies and solid untruths that become harder and harder to reject.


My plea concerning labels is to give them sparingly.


My plea concerning cleanliness and order is to love yourself, others and the environment you’re responsible for enough to care for it with maturity, responsibly, gratitude, and with love. If you've labeled yourself as a wreck or incapable or in any other negative way, pull that label off and stick on something more positive, and then begin the powerful and kind thought and heart work required to become a more positive "label"to gain that more joyful quality.


Yes, my home is now on the market. And yes, you can open the closets, cupboards and drawers and not be traumatized. I don’t care what anyone thinks about my organization system or color scheme or styles. I do care about my financial asset and my present possessions, future belongings, my family, our lifestyle and our peace and joy.


The hymn Love at Home by John H. McNaughton contains this line: “There is beauty all around, when there’s love at home.” Often as I sang it as a child, or someone “preached it up” over the years, a conclusion was drawn that the hymn referred to spoken love and acts of kindness in a family and home environment. But even as a child I saw it as meaning love in not only how the people treated each other within the home, but also in the quality of beauty and love for the physical environment that houses us. 


The lyrics contains strong words: hate, envy, joy, annoy, love, bloom, bliss, way of life, sweet, strife, willing, rift, healing, pressure, task, etc. These words can be wrapped up in not only how the family thinks and speaks, but how they respond to their possessions and interact with them, including the walls over their heads, the floors beneath their feet, the items hanging in their closets and who is responsible for each aspect of the physical home and belongings. 


I believe that home is the most valuable personal space we have in this life. It’s our haven. I try to make mine give peace and protection in a multitude of ways, not just as a place to sleep, or a pretty canvas to live life on, or where most of our money is invested and spent so the bank doesn’t kick us to the curb. 


There is no OCD—let me repeat this loud enough so everyone hears—there is no OCD in washing the dishes you choose to own and eat off of every time you use them. There is no OCD in cleaning the floor you selected to walk on, or putting away the toys you spend your money on. There is no OCD in organizing a pantry so you can find the pudding, cold cereal and a can of soup. There is no OCD in folding and putting away clean clothing so it doesn’t wrinkle in the bottom of a “clean” laundry basket. There is no OCD in having dinner ready when you’re the stay at home person (or mostly so, or the first one home that day) because you know having a decent dinner together relaxes tension and lends to family unity at the end of a long day away from home. There is also not “It’s so 50’s, Mom!” about it when you love the person coming home and you look forward to sitting at the table with him while you eat and talk, laugh, plan and relax together.


Yep, I was handed another label this week. This time I said, “Whoa! Back that pony and cart up! I’m not dancing through the kitchen in an apron and pearls holding up a spoon for an image, or out of fear, or because of tradition, expectations or demands. I’m building a relationship and have chosen a time and place to nourish it as easily and completely as possible in the space of time I have in each 24 hour segment.” (Or something to that effect.)

(P.S. We just celebrated 40 years together. Not without bumps, but also not without love.)


Do you see, it’s not easy or obvious why others do what they do, say what they say, or why the labels they chose for us have no possibility of sticking despite their efforts, and vise-versa with the labels we apply to others!


Labels—when someone sticks them on you, or attempts tobe honest and take a look at it, realize they see only a small faucet of the jewel you are, and most likely they see it in an obscured, unfocused way. None of us needs to let any undesirable label stick. Pull it off, even if it takes time and a lot of tugging. Place the correct label on yourself boldly, and with confidence. And when it comes to others, do your best to encourage them to select the best kinds of labels that they possibly can, and to not label them negatively, even on accident (self-preaching here, too), and then beg for mercy and forgiveness when you do. Not always to their face, because usually that isn’t possible, but to your God who is full of mercy and sees all and knows all and loves helping us affix the best labels on our lives as possible.